Thursday, November 3, 2011

Ikea Ottava Hack


Hi there! I hope you had a great Halloween. I love it, but I'm glad to have the house look "normal" again and not like an abandoned haunted house of horrors! 

I've been busy on the kitchen again. This time I changed out the can light over my sink and installed the Ikea Ottava. It looks great with the modern cottage feel. Once again, I turned to a few of my favorite bloggers for guidance, The Lettered CottageIsabella and Max Rooms and The House Of Smiths

Since I had a can light above the sink, I used the Hampton Bay Recessed Light Adapter just like Janell and Shelley. It was somewhat hard trying to figure out how to attach the screws with the spring clip things to the inside of the can. After that, it was a snap. I didn't have to cut the cord to shorten it like Layla and Shelley did. I simply tucked it into the ceiling cap along with the capped wires. I used a 10 inch ceiling medallion to hide the adapter and give it a finished look.


It looked great. But, there was a problem. When the light was on, the bulb was too bright. I kept seeing spots every time I went into the kitchen. LOL So, I remembered reading what Layla did to soften the light. She sprayed the glass cover with a frosting effect. Brilliant! It was so easy and effective. Just a couple of coats and it dried fast too.


Ahh, much better! I was also playing around with the idea of spray painting it a dark bronze color for a little more contrast. What do you think? 

Wednesday, October 26, 2011

Surprise!! I finished the Beadboard Backsplash!


It's amazing what writing a quick post can do to get you motivated to finish projects! I was sure I wouldn't get around to finishing the back splash until Spring, but I did it! ALL. BY. MYSELF!!! With the exception of my Dad helping with a minor electrical problem. (When I cut the power off to the outlets, the one that the coffee maker uses, went dead. My dad did the investigative work on that one and helped me replace the outlet all together. Thanks Dad!)


I can't thank The Lettered CottageThe Empty Nest, and The Handmade Home enough for all the inspiration and how to's!


I made all of my cuts with a jigsaw borrowed from my Dad. (Thanks again Dad!) Just like Ashley at The Handmade Home, I hot glued the bead board onto my existing tile back splash and the corbels too!


Here's a look at the before: 


And After!!:


Tuesday, October 18, 2011

Some Halloween Decorating

Long time, no post! I don't really have an excuse either. I guess, I just haven't been very motivated lately to write and upload photos. Still haven't completed the kitchen...:0/ Hopefully I'll get around to it in the next few months. 


But, I have been decorating for Halloween! Every year, my Mom and I host a Halloween party at my house. I think it's our favorite holiday besides Christmas. Shocker, huh? I think that's probably true for most people. LOL 


With some spooky special effects via Instagram, here's what I've done so far:


I made these candles look bloody by simply dripping red wax down them. 


The white treat bag was made using Martha Stewart's skull potato stamp tutorial. 


Wednesday, June 29, 2011

Kitchen: Phase 2-ish

Hey there! Thought I would share some progress photos of the kitchen during Phase 2....ish. I say "ish" because the bead board back-splash isn't attached and properly trimmed. But, I've been painting the corbels that will go under the cabinets once that is in place.

I've also been working on a cute decorative wall accent for above the cabinets. I loved the wooden letter words that Ashley from TheHandMadeHome cut out and covered with some lovely yellow patterned fabric. I found some wood letters at Hobby Lobby and painted them in a chevron pattern and another pattern. I love how it turned out!


I recovered my bar stools and made some curtains using a table cloth on clearance at Target. I paid $7!


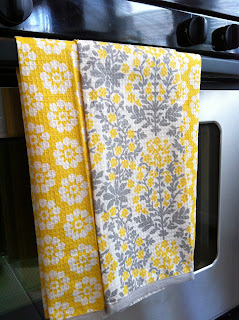
I also found these kitchen towels at Target on clearance for $10 or $11. A nice compliment to the grey and yellow scheme.  


Almost forgot to mention installing kitchen knobs and pulls on the cabinets! I got mine at Ikea. I went with Svep in black for the white cabinets and Lindsdal for the island.
Can't wait to get the bead board and corbels in place! 


Tuesday, June 21, 2011

Thrifty Purchases

Hey there. I've been scoring some good bargains lately at my local Goodwill and wanted to share.

First up is this cute white frame with navy carved pattern. A whopping $2.


This shadow box was $4.55.


This planter was $2.


I LOVE this metal bowl! It looks great with my orchid. Best part, it was 99 cents!!


I found this vibrant blue lamp shade for $2 and the silver plate/platter was $3.


The metal fruit holder was $4 and the blue jar and green vase were free thanks to my Mom!


All this for less than $20! 

Suzy :0)


Tuesday, June 14, 2011

Birthday Cakes

May is a busy birthday fest in our family. My youngest daughter's birthday is at the beginning of May and my son and dad's birthdays are at the end of May! Then a week into June comes my sister-in-law, niece and husband's birthday! Phew...

Sooo, I thought I would share my youngest daughter and son's cakes that I made myself.


As if a rainbow of skittles wasn't colorful enough!


It was a hit with the kids and the adults. I made the butter cream icing from a box mix by Wilton. YUMMY. It wasn't too sweet, just right. 


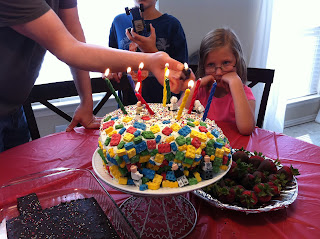
The cake almost slopped off the plate. I needed help and fast! Good thing the Lego Dudes came to the rescue! LOL 


I found these cool Lego candies and used real Lego dudes. The inside layers were colored in primary colors.  I also used the same Wilton icing mix. MMM...MMM!

Suzy :0)

Thursday, May 12, 2011

Painted Kitchen Cabinets

I'm on a serious painting binge! My latest inspiration came from three different cottage-style kitchens: The Lettered Cottage, The Empty Nest and The Handmade Home. I'm in love with the modern cottage look in kitchens. The whiter the better with pops of bright colors. I consider this "phase 1" of my kitchen. It's not quite there yet but getting closer one project at a time and pennies permitting. :0)

Here's what I've done so far:


Leaving the doors off certain cabinets allows me to display items and add to the cottage kitchen feel. I will be painting the backs Martha Stewart's "enamelware" and adding bead board over the tile back splash. 

Here's some befores with rusty red walls and tacky oak cabinets:


Even with windows, it's so dark isn't it?


Can you believe I painted all those cabinets by myself? 


It's amazing what paint can do:


So much brighter!


I glued corbels, with liquid nails, to the island and plan on doing the same under the cabinets after installing the bead board over the back splash. The chairs helped keep everything in place while the glue hardened.


Paint colors used:

1 Gal. of Glidden Latex Primer

1 Gal. of Behr "Ivory Mist" paint and primer used on cabinets

1 Gal. of Behr "Dolphin Fin" paint and primer used on the walls

2 Quarts of Behr "French Roast" oil based paint and primer used on the island and corbels

In case you're also interested, I bought the corbels at Home Depot. The baskets in the cabinets and the light fixture above the table are from Ikea.


That's it for now. The next phase will be attempting to install the bead board over the tile and capping the ends with trim and gluing corbels to the upper cabinets. Oh, and paint a final third coat on the white cabinets and the bead board, and touching up the paint on the island. Am I in over my head or what? LOL It might take me months, but I'll get there. 

Suzy :0)