Monday, November 29, 2010

Handmade Peace Ornaments for Christmas

I whipped up some very cute and easy to make peace sign and dove ornaments for my tree this year. 


They were made using images I found online. All you need is some card stock paper, white glitter, spray adhesive, acrylic gems and ribbon. 

Here's how I did it: 


I folded a piece of card stock in half.


Then, using the printed image I found online, I made a stencil that I could trace onto the folded card stock. 


After cutting it out, you will have two doves. 


Using spray adhesive, glue the two doves together. This will help make it more sturdy so that you can use them again next year!


Next, make a hole for hanging your ornament. I used a hole puncher. Then, spray adhesive on one side and sprinkle the glitter evenly. When it is dry, flip it over and do the other side. 


Hang it on the tree with some ribbon and enjoy the sparkle! 


The peace sign ornaments were made using the above steps. But, instead of sprinkling glitter on them, I glued acrylic gems with spray adhesive. 

They made my tree look extra nice and they were fun to make! Enjoy! :0)


Wednesday, November 17, 2010

Kids Table Redo

CHEAP table redo. I turned this tacky kids table into a cute and simple kids "cafe" bistro table. :0)
                                                            
                                                                         Before:


After:


I was afraid my daughter would be upset that I painted over "Dora". But, she actually likes it and plays with it more now!


Thursday, November 11, 2010

More of My Master Bedroom

Well, as promised, here are some more views of my master bedroom progress. The only area that is done, except for maybe a headboard, is around my bed. Sadly, the rest of the room is bare! I will continue to update you on my progress, one craigslist or bargain find at a time!

First, I thought I would share the bedroom that inspired me. I fell in love with this amazing room on ratemyspace.


It captured everything I wanted in a bedroom. To me, it was the perfect blend of contemporary and traditional style. The paint color is so calming and I love the contrast between the dark furniture pieces and the crisp white bedding. Sigh. From the lamps, accessories and paint color, to the "B" detail above the bed. It's just perfect in my eyes. So, I set out on a mission to capture the essence of that room as much as I could on my VERY limited budget...


Here is my husband's nightstand. Those moss balls really helped add a natural element in the room and a little color. 


In the original room, vinyl decals were used. I decided to save some money by only buying the "A" circle decal and only because it would have been very difficult to replicate. I found an image of the scrolls online and  enlarged and printed it. Then, I traced and cut the design out. Finally, I taped it onto the wall. It doesn't lay completely flat, but I like the subtle shadows that are created. 


I'm happy with the results so far. I think the part I've enjoyed the most is using my creativity. I'm almost glad I have a limited budget! I know what you must be thinking: she's crazy. But I actually enjoy having to think and find different ways to make it mine. I hope you like it too. :0)


Wednesday, November 10, 2010

Some of My Artwork and Crafts

Today, I thought I would share some art and crafts that I have made.
I really love paper art, so I decided to try paper quilling. It's a technique using strips of paper that are rolled up using a special tool and folding them into shapes, usually flowers.


(Side Note: See how the soft grey background in this shadow box really makes the colors in the paper quilling art pop? I'm thinking this might be a nice paint color for my daughter's bedroom.)


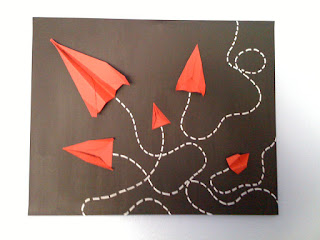
I made this for my son's bedroom. I bought a piece of canvas, painted it black, folded red card stock paper into paper planes, used a paint pen to draw the plane trails and hot glued the planes in place. Super easy!


Gotta love those infamous candy lips! I whipped up this for my daughter's room by searching online and finding as many "candy lips" as I could and printing them off. Then, I glued them onto a piece of canvas. Instant "Pop Art". I also did some other collages from thumbnail images found online for my daughter's room.


I was so inspired by some pretty wreaths I found on etsy, that I decided to make a similar one for myself. I wrapped tissue paper around a foam wreath. I used miniature pin wheels, scrapbook flower stickers, and traced and cut the bird, butterflies and bicycle. Check out this amazing wreath maker's blog here!


Tuesday, November 9, 2010

Colorful Teen Bedroom

My 14 year old daughter was getting tired of her bedroom and frankly, so was I. It was starting to look a little busy and not very restful. The purple was creating a lot of noise and the posters looked tacky thrown up on the walls. That phase was over and she was ready for a more sophisticated "artsy" look.

Here's the after: 


Here's a before with my daughter's friend being goofy. LOL


Bringing in more white into the room helped tone down the purple walls. By changing out the nightstands to lighter, less bulky pieces, it helped balance out the dark dresser. New bedding added interest and texture. I love the black and white pattern in the pillows!


A couple of years ago, I made these collages from thumbnails I found on a friend's Myspace profile. I printed them off into 3" X 3" squares and made a collage. The frames I found at Walmart on clearance. 


I made the paper wreath after seeing some amazing wreaths I found on etsy but couldn't afford. 


Most of the accessories she already had. We bought new nightstands, white comforter and curtains, and black & white pillows at Ikea for under $200. She loves it but is begging me to paint the walls a blue grey like my Master bedroom. I like the purple now and I think it works well with her new decor. What do you think?


Monday, November 8, 2010

Some Weekend Shopping

I love Hobby Lobby and I really like it when they have 50% off sales on decor! Picked up this beautiful mirrored jewelry box for just $11.


My master bedroom has been a long time work-in-progress and it's finally coming together. Here's a photo of my bedside that I consider "done". The art on the wall I made by finding a sketched drawing online, printing it and tracing it with ink onto tracing paper. It creates a layered texture and a "handmade" appearance. The picture on the left of the nightstand is just a pretty piece of scrap booking paper framed. Stay tuned, I will post again soon about my bedroom. 


To be continued...


Thursday, November 4, 2010

Paper Butterflies, So Much Better Than Vinyl Decals

A few months ago, my friend Heather, a hair stylist, asked me to help her decorate her new salon space. She wanted something unique and eye catching with a sophisticated modern feel. She initially thought of buying some vinyl decals to use on the walls. But, we couldn't find any that we really liked and some of them were pricey.

Around the same time, I had discovered some amazing butterfly art done by Paul Villinski. He cut the butterflies out of beer cans he found on the streets of New York City. Heather loves butterflies and agreed that this would be amazing in her space. This is what we came up with:


She chose a soothing yet fresh paint color in Hydrangea Blue, and we decided that the butterflies should be white with a few black sprinkled in for contrast. I drew some of the butterflies by hand and traced a template for the others from pictures I found online. Since I have ZERO experience cutting beer cans, I used watercolor paper for the white ones and card stock for the black ones. The thickness in the paper is essential so that they don't start sagging over time. After cutting all the butterflies out, we hot glued them onto t-pins and arranged them on the wall. We wanted them to look like a flock of butterflies flying away toward the window.


This is soooo much more dramatic than a flat wall decal and it was amazingly cheap comparably. By using the pins and lifting them off the wall, it creates movement and dimension. Her clients were blown away and everyone wants to know where she bought them! With a little inspiration, we achieved high design for just a few pennies.

Wednesday, November 3, 2010

Color Chart for My Kids

Yes, this has nothing to do with decorating. But, I can't help but want to share my struggles of getting my kids to behave at home. Both my son and youngest daughter are very strong-willed children and love to test their boundaries ALL the time. My husband and I were at our wits end to find a way to get our children to listen without having to constantly raise our voices and send them to their rooms. There just didn't seem to be any consequences or reason for them to follow the rules. Until now!
At school, they are very well behaved. So, I started looking at the behavior system that was being used. It's a color chart consisting of blue, green, yellow, orange, and red. Every morning, the kids start on blue. They each have their own clothespin with their names on them. Blue means that all rules are being followed. If a rule is broken, they have to move their clip to green. If they break another rule, they move to yellow and start losing recess time. Orange, even more recess time. Red, may lose all of recess time and possibly a trip to the principle's office. If they end the day on blue, they earn a "Bug Buck" which can be used to "buy" a toy from the treasure box.  You get the idea, right?
It works so well at school and the kids already understand the rules and consequences; I decided to adapt it for our home. This is what I did:


I printed circles onto colored paper with a positive message and reminder.
If they drop to green, it takes 30 minutes of good behavior to move back up to blue. If they move from green to yellow, it will take 30 minutes to get back to green. And another 30 minutes to get back to blue. If they drop to orange, they go to their room for a time out. For my 5 year old, it's 5 minutes. For my 8 year old, it's 8 minutes. If they get on red, they are grounded from all activities such as video games, tv, computer, playing outside or with friends for 30 minutes. 


Then I printed their names and taped them onto magnets, since ours is on the fridge.


A trip to the store to buy an assortment of $1-$3 "treasures". They must end the day on blue in order to get a "treasure buck". They can also choose to "buy" one treasure or save their bucks to get a bigger treasure at the end of the week. 

After a full week of using this system at home, we have seen a total change in our kids' behavior! It works! They have only dropped down to orange one time and every day they have worked back to blue by the end of the night. Our home is no longer filled with tension and stress. We have not had to raise our voice or constantly send them to their rooms. All they needed was a little structure and a goal to work toward. It's such a wonderful feeling being able to enjoy my children again. :0)


Tuesday, November 2, 2010

Decorative Moss Balls

Recently, I bought a glass apothecary jar and wanted to find something unique to put in it. I happened to have some leftover dried moss from another project and some foam balls. So, I decided to make some moss balls! Here's some pictures to show how I made them (very simply with hot glue) and how they look displayed: 


Simple, cheap, and decorative! I love these three words. 

Monday, November 1, 2010

Halloween, The Nightmare Party Aftermath

Wow, I am sooo worn out from this weekend. I hosted a Halloween party for my 3 kids with lots of help from my Mom and Sister-in-law. I could not have done it without them! The party was a hit and full of fun and laughter. Not scary at all. Until the next morning....The Aftermath from Hell! I love throwing parties for my kids but I always dread the nightmare of cleaning up afterward. Will my house ever be clean?

Enough whining! Here are some highlights from the party and trick or treating. Enjoy :0)


The chowdown begins. 


Care for a rotted finger?

Maybe some bloody eyeballs?

Freshly buried grave?

Fruit and chocolate. Yummm. 

Bobbing for apples!

Carving pumpkins. 

They turned out great!

Next night, trick or treating!

My oldest daughter on the right and her friend. They were nerds. 

Now onto planning Thanksgiving. I'm thankful that it will be at my parent's house and not mine!